The Dispute Wizard is the core of Credit Repair Cloud. It creates dispute letters lightning fast.
The dispute wizard takes your negative items, guides you to tag them, and merges them into perfect dispute letters. Before explaining about the dispute wizard, here’s important information to understand about the letters you will be creating so you can minimize data entry: The Library has over 100 letters. You can add your own and edit them any way you like. Most of the letters fill in automatically by wizard 3, but there are a few “unusual” letters you’ll need to edit manually in the Wizard Editor page. There are also a 2 or 3 special letters that have “no” dispute items” at all. For those you’ll use the Wizard 3 button that says “Create a letter with NO Dispute Items.” There are Quick Videos to show you how to do these things. As a rule of thumb: If you follow default Wizard steps with the default letters, 95% of the time your work will be point and click with no editing. But if you’re trying to do something special or use an unusual letter, yes, you’ll have some typing to do. Most big companies who use our software save time by using the default letters. This will save you time and money and reduce manual entry.
There are 2 ways that the Credit Report Items are added to Credit Repair Cloud: Manually…or by Importing the online reports. You can see videos for both in the Quick Videos page.
- If you’ve IMPORTED an online Credit report, you’ve already tagged your dispute items and all you need to do is Run Wizard 3, add saved items and follow the steps in the page.
- But if you’ve received a Paper or PDF credit report, or a report from a provider that can’t be imported, you’ll need to add the items manually…
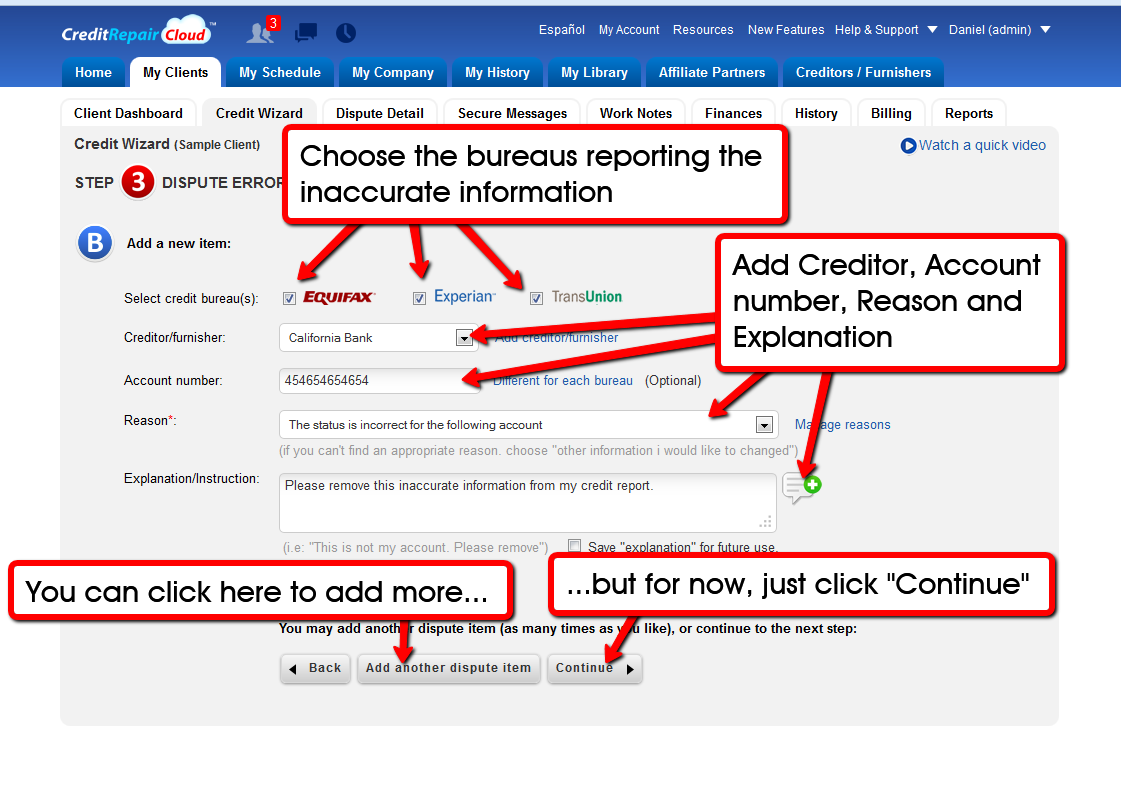
For manually adding items to the wizard: Hold the report in your hand, circle the items you wish to disputes, and enter them into the wizard. You can add all the info you like to the drop-down menus, so it’s always easy and fast.
- Wizard 1 is for ordering reports
- Wizard 2 will guide you to review reports and find errors
- Wizard 3 creates the dispute letters
Here is a video to show you how easy and fast this is:
Creating your Disputes in Wizard 3
Many people ask why the credit reports don’t automatically import and fill in the fields. The answer is that this is not possible or practical. What we’ve done instead is make it as simple as point and click. Info and 1 minute demonstration are here on this page https://www.creditrepaircloud.com/features/dispute_automation
So how do I create a credit dispute letter fast?
Once you’ve entered in your clients, creditors…and added a few reasons and explanations of your own, then it’s just a matter of point and click and you will create perfect credit dispute letters in seconds. All you’ll need to type is the account number. The rest is a few clicks…and this is faster than any other method. Here is a huge timesaver when creating disputes:
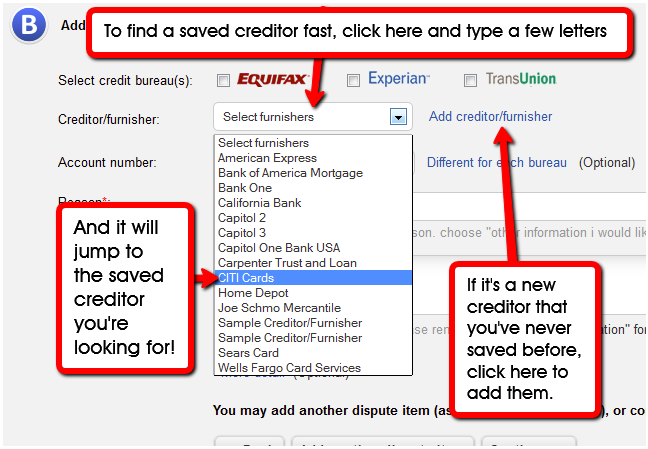
Finding saved creditors fast (in Wizard 3)
If you have hundreds of creditors/furnishers saved to your account this will be a great time-saver. When you are in Wizard 3 and choosing a creditor from your list, click “Select Furnishers” and start to type the first few letters of the creditor’s name. The dropdown list will jump right to the record you are looking for.
Click to zoom
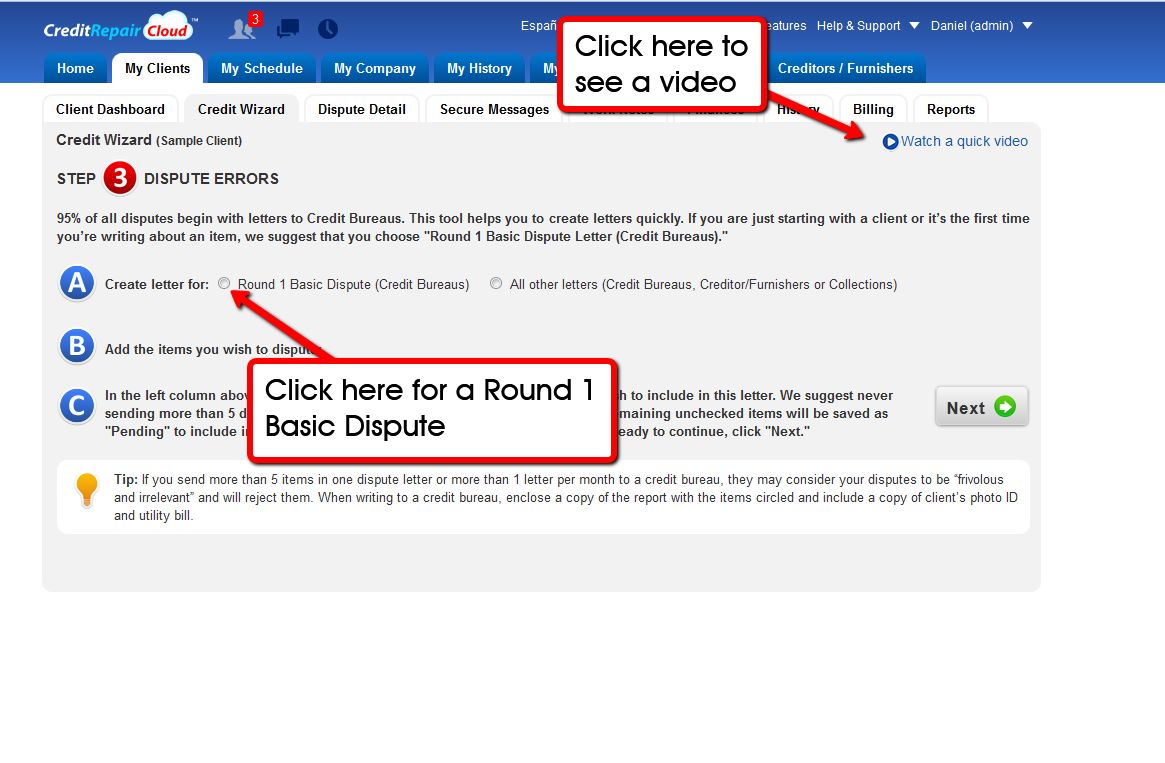
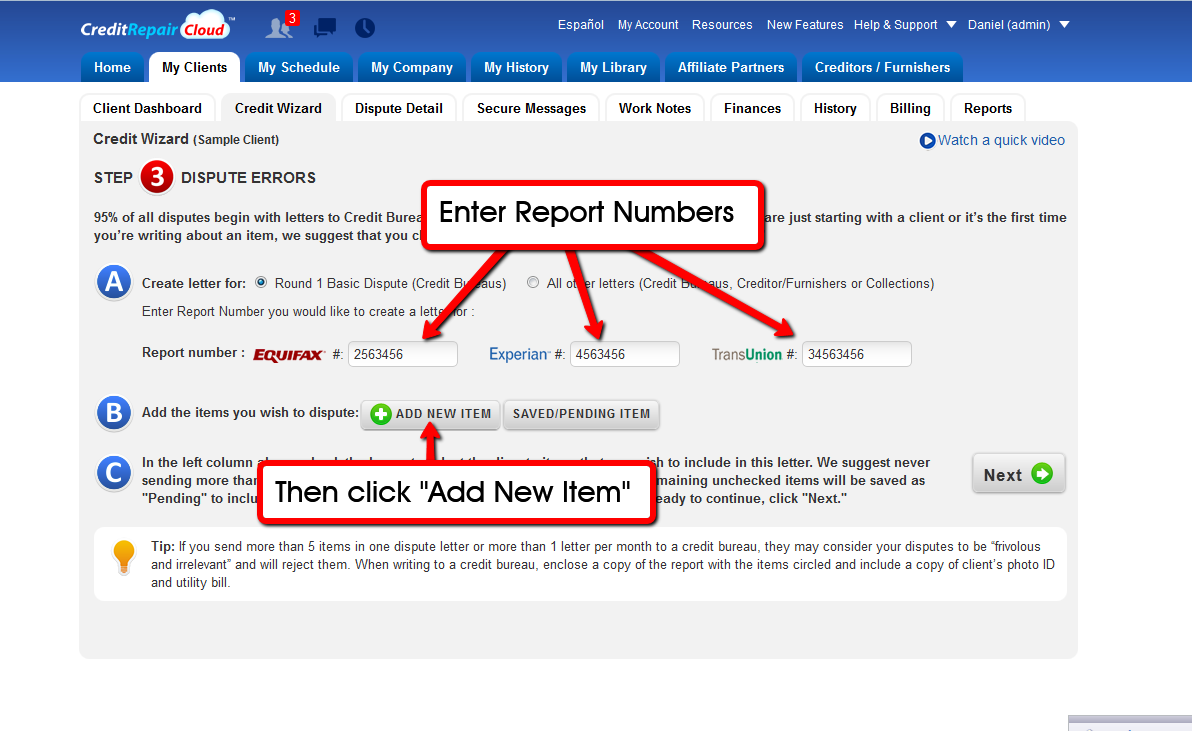
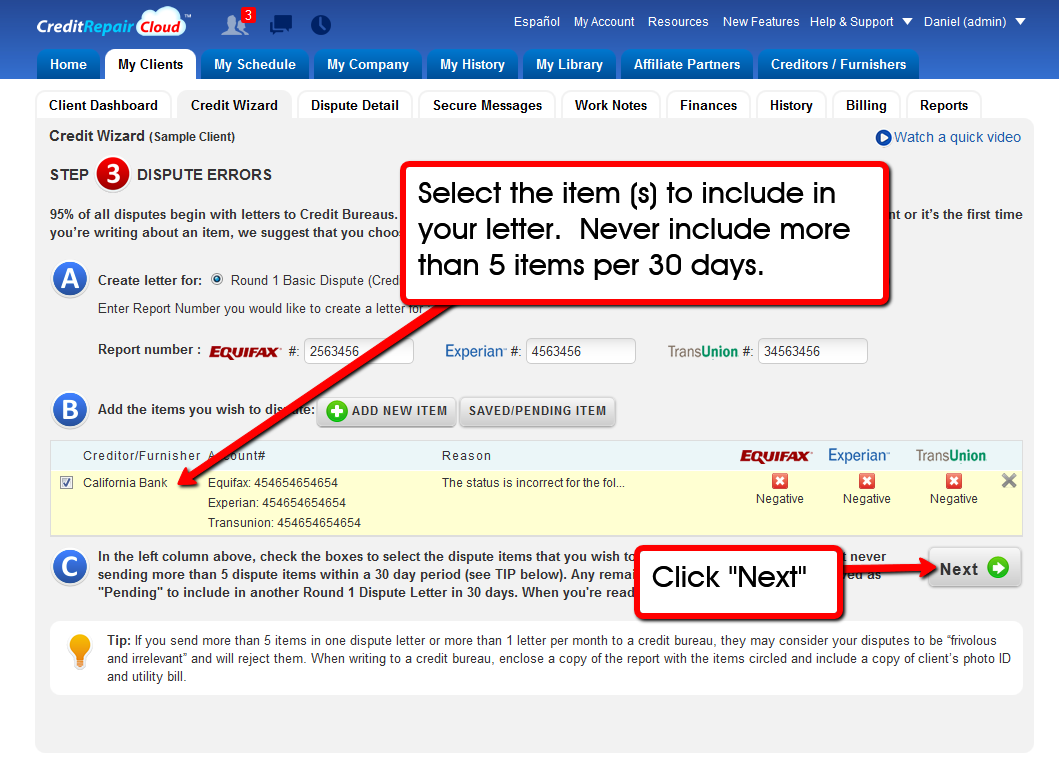
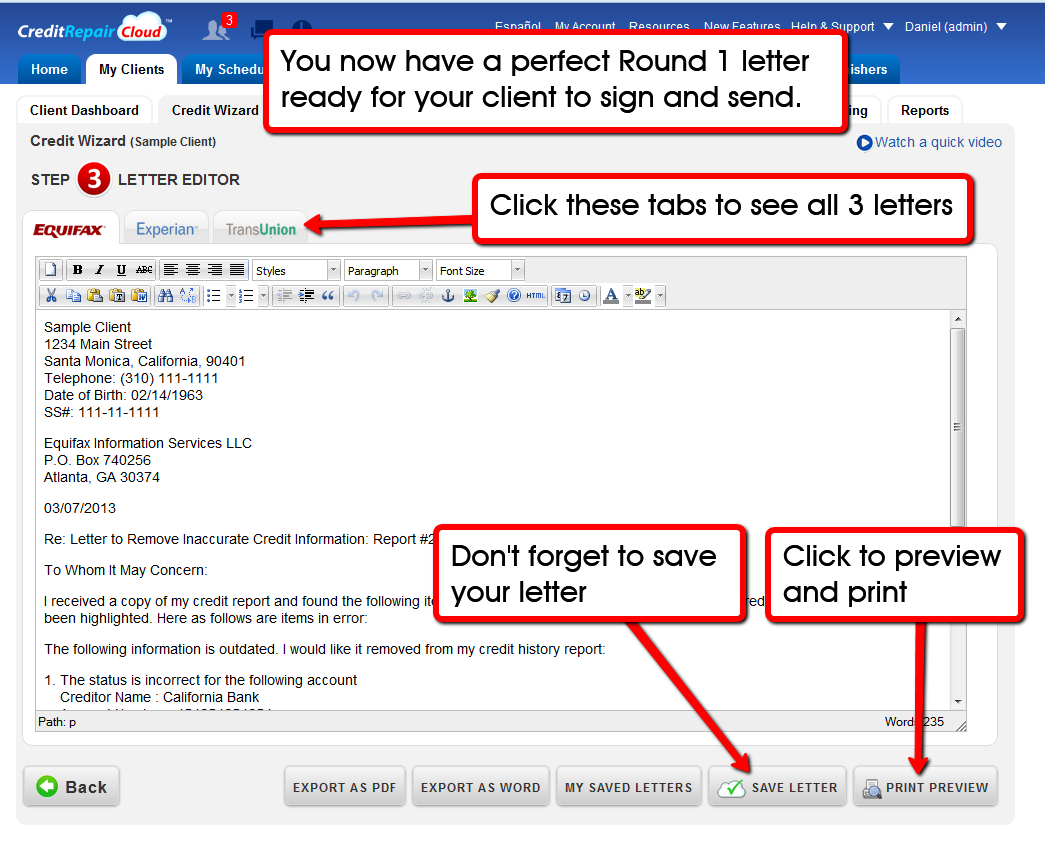
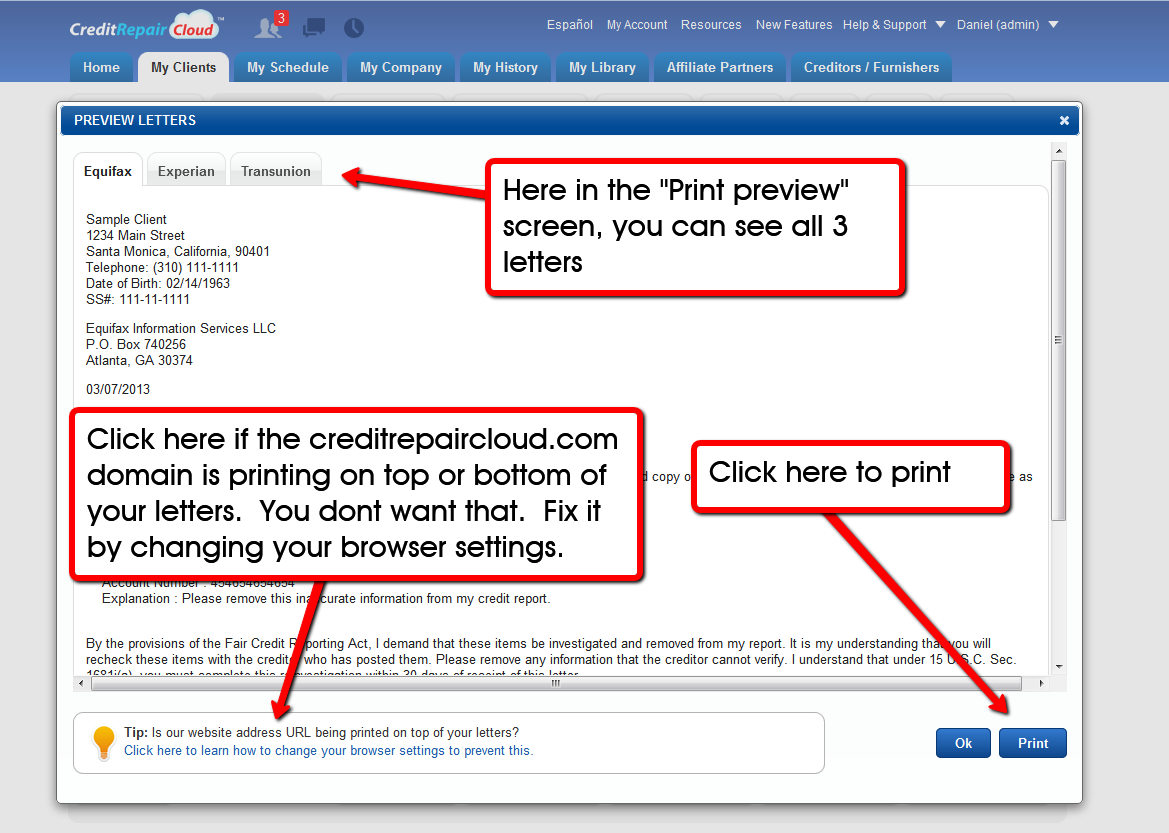
Wizard 3: Round 1 (Basic Dispute Letters)
Here are some screenshots to show you the steps for Dispute Wizard #3
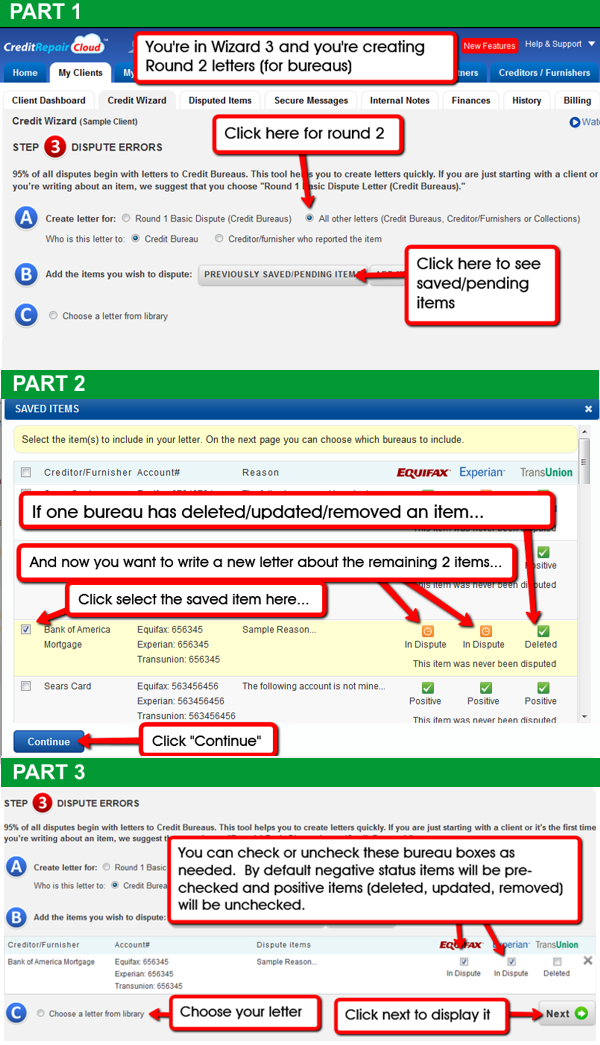
Wizard 3: Round 2 Letters (and higher)
If 30 days have passed and the bureau has not removed or updated an item, you will now need to send a Round 2 letter. If none of the bureaus have corrected the item you will write again to all 3 bureaus. However, if one bureau has deleted/updated/removed an item (and it’s status is now “Positive”), but now you want to write to the other bureau(s) about the same item that they’re still showing as “negative,” here’s how:
- Choose Wizard 3, Round 2 (Choose Radio Button 2 for “All other letters”)
- Choose “PREVIOUSLY SAVED/PENDING ITEMS” and select the entire dispute item with the checkbox on the left
- Click next (as illustrated in this picture)
- On the next page you can check or uncheck the items as needed. By default negative status items will be pre-checked and items with positive status will be unchecked.
- Choose your letter and click next to see your letter.
Here are a few things to keep in mind to minimize data entry: The Library has over 100 letters. You can add your own and edit them any way you like. Most of the letters fill in automatically by wizard 3, but there are a few “unusual” letters you’ll need to edit manually in the Wizard Editor page. There are also a 2 or 3 special letters that have “no” dispute items” at all. For those you’ll use the Wizard 3 button that says “Create a letter with NO Dispute Items.” There are Quick Videos to show you how to do these things. As a rule of thumb: If you follow default Wizard steps with the default letters, 95% of the time your work will be point and click with no editing. But if you’re trying to do something special or use an unusual letter, yes, you’ll have some typing to do. Most big companies who use our software save time by using the default letters. This will save you time and money and reduce manual entry.
Here are 2 screenshots of the standard flow in the wizard for Round 2 letters:
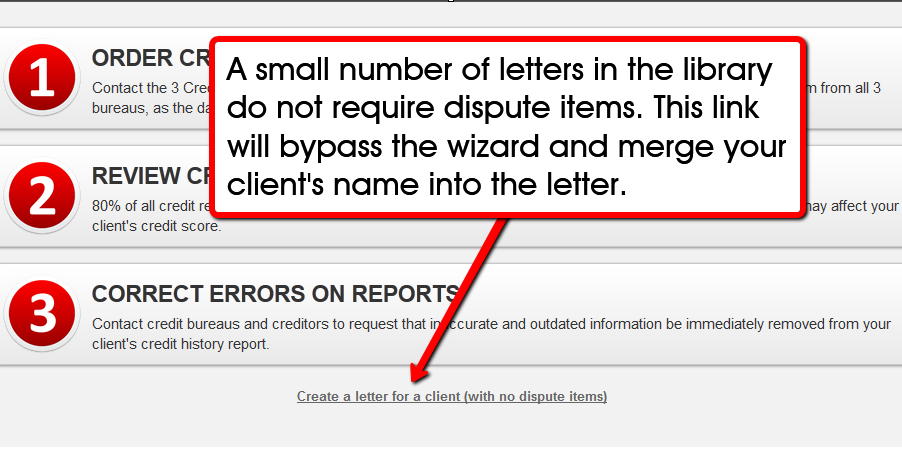
Wizard 3: Using Library Letters with NO Dispute Items
How to Create a letter with no dispute items
A small number of letters in the library do not require dispute items. An example would be the Chexsystems letters. If you want to use a library letter that does not need dispute items, use this new special link. If the letter has placeholders for your clients name and address, those will auto merge into the letter and you can make any changes needed when it appears in the editor.